Thursday, January 21, 2016

Winter is the time to plan your spring garden!

We're expecting a big snow storm in Southwest Virginia in the next couple of days. Frigid temperatures, blustery winds and predicted snowfall have most folks longing for the warmer
temperatures and sunshine of spring. You might not realize it, but January is the perfect time to start planning your spring gardens!


While it is snowing over the weekend, why not take the time to plan what you want to plant this spring? Are you planting tomatoes, corn, cucumbers, onions and the like? Will it be an herb garden? Watermelons? Radishes? Once you have decided which delicious, warm weather growing foods will populate your garden, it's time to find your seeds. Take a look at a seed catalog and make out your order. You'll also want to order a garden seeder to help with planting. Why risk an achy back from being bent over and planting the seeds when you can let your garden seeder do the work for you?


After you have your seeds in place, use a high wheel cultivator to cover your rows of seeds with dirt. Cultivators are a versatile tool for gardening. From furrowing and light tilling to cultivating and hilling, you will find a multitude of uses for it!


Stay warm and safe in the snowstorm that is on its way! Dreaming of and planning for your spring garden is a surefire way to warm you up!


Friday, July 10, 2015

Collecting and Cooking Chanterelle Mushrooms for Breakfast Omelette


Eating foraged foods physically connects us to the local ecology and change of seasons. Chanterelle Mushrooms are a delicacy you can collect, clean and cook on the east coast throughout Summer. We harvested these Chanterelle mushrooms in Southwest Virginia for a breakfast omelet.

 Chanterelles inhabit moist and mossy areas with old deep leaf litter. This easily identifiable golden/orange mushroom looks like a blossoming trumpet. There are a few varieties of Chanterelles, which are all edible, however, one "look-a-like" is poisonous. It is called the Jack O' Lantern mushroom, which is distinguished by its long gills on the underside of the body and an orange interior meat. The Chanterelle will have a white interior meat. 


Cleaning - Brush and rinse dirt off in running water. Drain and air dry. Do not soak (mushrooms would lose integrity). Chanterelles are best cooked immediately, however, can be refrigerated in a brown paper bag for 1-2 days. 


Cooking - Cut Chanterelles into medium-large bite size pieces. A larger cut celebrates the mushroom's profile for more flavor and consistency. Mushroom slices will also lose moisture and decrease in size during the pan fry.

Rada knives are light and maneuverable for a sharp and consistent cut!

 Simply saute in butter on medium/high heat for about a minute. The video below demonstrates this brief process with finely chopped onions. Mushrooms have a tendency to take on any flavors they are cooked alongside. 


Remove the mushrooms and onions. Whisk a few pastured eggs and fry in a pan on medium/high heat with oil/butter. When eggs are cooked on the underside and still a bit runny on top, add the mushrooms and onions on one half side then fold the other side over. Turn off heat and remove pan from heat. Put a lid on top to sit for 2-3 minutes until serving.


We split the omelet and laid each half on a bed of spinach and baby tomatoes. The final experience was reminiscent of the flavors of Appalachia in July. Including four eggs, two tablespoons of butter/oil, and veggies, one omelet between two people is roughly 300 to 350 calories each. 

For a healthy and wholesome meal, this egg omelet is beats the competition. 


Thursday, December 18, 2014

The Best Christmas DIY Decoration Idea

Tiny Red, Green and Copper Cowbells hung with twine are easy, chic, classic and versatile Christmas decorations. 


Let's decorate our new house for Christmas!

When I moved last, after graduating college, I donated or otherwise left any tinsel, lights, Sorority Santa hats, stockings once decorated with glitter and ornaments I didn't pick out of the community beer can recycling pile. 

My Christmas decorations? I was starting fresh.

I decided a short time ago, that it's not just what we buy - although securing particular items we want is still worthy - it's how and where we buy or secure it from that brings us the most value of owning the item. Plus, I didn't want to purchase decorations that contribute to the deterioration of our planet and living systems. Considering, you know, the Christmas spirit and celebrating life. anyway...

We have so many little tiny cow bells. I had a ball of twine.
I tied each cowbell onto the rustic twine so it would keep it's position. 

red and green tiny cowbells hung horizontally with twine

How about that for a simple, old-fashioned and unique Christmas decoration you can make yourself?! For extra flair, try adding additional ribbons and twine as bows. Find Christmas Bells here.

tiny green hanging cowbell with twineSanta Ribbon on Copper Cowbell in hanging cowbell decorationjungle bell

When you're done with long strings of hanging cowbells, they make adorable and unique ornaments too! 

Maybe thrift will again be a dominant social idea? And if it is, do we get to make more crafts?


Wednesday, June 11, 2014

How to collect wildflowers and woodland plants

Before you collect -

Knowing your wild plants - the kind of soil, degree of shade, amount of moisture, temperature, acidity, and the other conditions that will made it grow best. 


Where to collect - 

It's fun to collect the wildflowers for your garden or diversify the woodland species in your landscape, because no matter how long you've been at it, there are always interesting additions to for your collection. 
The essential thing is to gather plants in such a way that you neither infringe on the rights of others nor lessen the supply of many of the species already too scarce. 

Pretty Blue Cosmos Flowers, eh?

Familiarize yourself with state laws prohibiting the removal of rare wildflowers, ferns, and bushes. Common kinds of plants - those especially abundant in any given locality - can usually be collected in reasonable quantities with little harm (Birdseye, 1951 p. 22-23). 

When to Collect - 

Wildflowers may, with sufficient care, be transplanted at any time of year, even when the ground is frozen. Generally speaking, however, it is best to transplant plants during their dormant seasons. That is, after plants have passed their periods of active growth. 

Coniferous trees can be best moved immediately after their new foliage has matured - the end of August to September. This allows enough time for the formation of new rootlets before freezing weather sets in.    

Most deciduous trees should be transplanted during the later part of September or early October, when their leaves are beginning to change color. However, in very cold areas they may be handled in the very early spring before their buds have begun to swell. Bushes are best moved after the leaf fall, when they are fully dormant  (Birdseye, 1951 p. 24-25). 


These deciduous tree seedlings (Yellow Popular pictured left in the purple metal bucket, Red Maple pictured right in the large light blue metal bucket and below in the small green metal bucket) I collected two days ago this spring. As long as these receive sufficient water, sunlight and other species-specific requirements they'll live long into their fall dormant period when they will be transplanted. 


Yellow-Popular or Tulip Tree (Liriodendron tulipifera L.)
This is a commonly occurring tree throughout Virginia, reaching its largest size along deep moist soils along streams and in the lower mountain coves. Height of 60 to 100 feet with diameters of 3 to 4 feet. The tree has been excessively cut, but is reproducing rapidly and is one of the most abundant and valuable trees in second-growth forests. It can be planted as an ornamental or a shade tree. The greenish yellow tulip shaped flowers occur in early April (Virginia Department of Forestry p.60). I think the leaf looks like the face of a cat.

Red Maple (Acer rubrum L.)
It is used as a shade tree (although the sugar maple is better for this purpose) and occurs commonly across the state. The tree produces soft maple wood used  for furniture, woodenware, and also for fuel (Virginia Department of Forestry p.60). 

Collecting Equipment
Sure, many kinds of wildflowers can be collected without any more equipment than a stout stick and your hands, but a certain amount of paraphernalia will save you a lot of time and sore fingers.
  1. Most important of all, you will need a long, strong (so brute force can be used in prying plants from rocks), sharp (to cut through hard ground and small roots) trowel like this one.  
  2. A keen bladed pocket knife will come in handy, particularly for cutting the stakes with which you should protect the long blossom stalks of certain plants and the large fronds of some kinds of ferns. Case knifes like these are durable steal made in the USA. 
  3. In addition to these tools you'll want one or more baskets with stout handles, in which to carry your plants out of the woods. 
  4. Have a half gallon of water to moisten roots dug from dry ground. 
  5. A plentiful supply of bags and wrapping material are also very important. You ability to successfully carry out your collecting operations depends on these. Bags should be waterproof and various sizes. For wrapping earth balls too big for bags, you will want some large burlap sacks or strong old cloth and safety pins.     
How to Collect
  1. clear away ground litter that might obstruct your process. 
  2. make a circular cut 12 to 18 inches in diameter and about 8 inches deep around the plant - these diameter measurements of the cut depending on the size of your plant and the depth depending on the soil conditions. There will probably be several extraneous small roots and stems to be severed by your trowel. 
  3. Pry out the root ball and place it carefully in one of your moisture-tight bags. 
Remember that no two patches of soil are exactly alike, and that your new plant will be most at home in it's new location if it is surrounded there by some of the earth from which you took it. 

I collected plants to give as gifts in these colorful buckets to be transplanted in the fall. Each bucket came with a plastic liner and holes should be punched in the bucket and liner bottom with a hammer and nail. Placing a few rocks in the bottom of the plastic liner helps with plant drainage - you don't want to drown your plants with too much water. 


Bibliography 

Birdseye, C., & Birdseye, E. (1951). Collecting Wildflowers. Growing woodland plants. New York: Dover Publications.

Forest trees of Virginia. (1992). Charlottesville, Va. (Box 378, Charlottesville 22903): Dept. of Forestry.


Tuesday, May 27, 2014

Wild Ginger, Homemade Cookies, Vintage Oil Lanterns and Pastel Mini Buckets from the long weekend

At Red Hill General Store, we had a wonderful memorial day weekend! Here's a few photos of finds from Memorial Day weekend yard-sales, flea markets and nature finds. 
On a Sunday afternoon hike we found wild ginger!

Wild Ginger in Virginia's temperate deciduous forest. 

Homemade cookies by Kassie at her lemonade stand!

Old kerosene lanterns. We picked up a vintage kerosene lantern for camping this summer for $45. You can buy a brand new oil lantern here (From $9 - $21) or replace the wicks from your antique memorial day finds (click here for replacement oil lantern wicks).  

Love these darling pastel mini painted sold-color pails. You can find these plus more sizes, shapes and colors here.


Saturday, May 10, 2014

Spring Time Creative Container Gardening

It's Spring!


Time to plant all of your favorite garden vegetables and annual flowers.


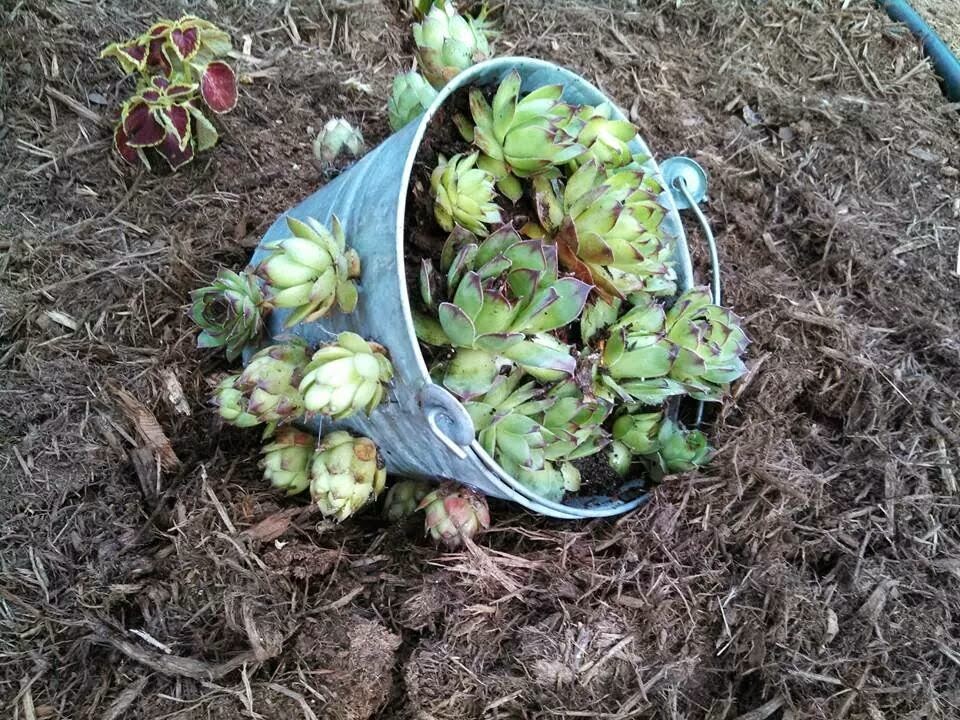
 Even though we are getting past the danger of frost that can create a devastating blow to much of our garden, when these late frosts hit. Consider planting more tender plants in containers. When planting in containers you can create a small garden that can be easily transported to a safe location when there is a frost warning for your area. Container gardening can be fun for all gardeners and can help get those of us that have less space to cultivate our interest in gardening. Many people when thinking of container gardening think of expensive terracotta or ceramic pots, but I think it can be more fun to think of interesting and creative containers to plant vegetables and flowers in. I got these great galvanized buckets from Bucket Outlet that have turned in to great container garden pieces that look great along with other plants around my home. The only thing I had to do to these buckets was to drill a few holes in the bottom to give them proper drainage.

Here are a few pictures of some of my buckets that I used for containers.

Hens and Chicks (Laid on it's side, and drilled holes in sides)

Tomato Plants (Sitting outside my back door, I can't wait to have fresh tomatoes!)

Annual Container (I have two of these sitting on my front steps)

The buckets I used for these containers are these 6 quart galvanized buckets.
Just remember to drill holes to insure proper drainage with these buckets. 

Also be Creative, if you have any pictures you want to share of your bucket containers,


Monday, August 26, 2013

How to keep tomatoes from rotting

This summer has been wet. The tomato crop this season has not been good.
Most people we've talked to say their tomatoes look like -

our heirloom tomatoes last week. 
Hopefully future summer weather will return to normal. In the meantime, we just learned how we can best plant our tomatoes in anticipation for summer rain next year. 

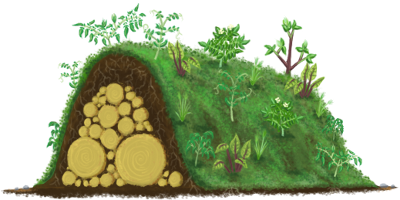
Our friend messaged us how he achieved a successful tomato crop, "My tomato beds are done in hugelkultur. 2 feet deep, filled with hardwood logs, and pile the dirt back on top to be about 2 feet tall. The tomatoes have good drainage now. They're up off the ground so the breeze can keep the plants drier than they would be planted at ground level. Constant water supply and they don't have wet feet. I haven't had a problem with bottom rot or moisture splitting despite all the rain."

They are pretty cool. The photo below is from this place and they have more information on this genius garden bed. 


With less rotting garden tomatoes - the more fresh food we can harvest to preserve for the winter! Read this expert canning supply post about making Salsa from Red Hill's tomatoes, green peppers and hot peppers!


Friday, June 21, 2013

Preserving Apricots

Apricots are in season in much of the country right now. So how can you get these delicious little beauties ready for preserving?

Making Apricot Jam:

Make your own apricot jam.

You will need:
8 cups of apricots, diced
6 cups of sugar
1/4 cup of lemon juice
5 pint jars or 10 half pint jars

Directions:
Get out your water bath canner and sterilize your canning jars by boiling for 10 minutes.
Get out a stock pot, combine all your ingredients and bring to a boil over med-high heat. Stir occasionally until your sugar is dissolved.
Once the sugar is dissolved bring to a rolling boil and boil for 30 minutes being sure to stir frequently to avoid your mixture from sticking to the stock pot.
Remove pot from the heat and begin filling your jars. Your headspace will be 1/4". (a good canning funnel will help to fill your jars with minimal mess.)
Wipe the jar rims clean and put your canning lids and rings into place. Screw on the rings to finger tightness.
Process jars in water bath canner for 10 minutes.

Dried Apricots

Dried apricots make a great snack anytime.

How to Dry your own Apricots:
Using a food dehydrator:
Split each apricot and place them in a single layer onto your dehydrator's trays.
If your dehydrator has a thermostat set it to 135 degrees. Allow the apricots to dry until their skin is leathery. This will typically take about 12 hours.
Check your apricots, they should be pliable and leathery with no juice.
Store your apricots until they are needed.

What is your favorite method for preserving your apricots?


Thursday, June 13, 2013

Set your Sundial

The best time and day to set your sundial for most accurate reading for the summer is on June 15th at 12:00. The next date that you will be able to set your sundial for accurate reading will be September 1st at 12:00.

To Set your Sundial
  • Make sure the spot that your sundial is in is level and has full sun.
  • The shadow arm (gnomon) needs to be pointed toward celestial north if you are in the northern hemisphere. This is different than the magnetic north that a compass will show you. To find celestial north you will need to set your sundial at noon. Turn the sundial so the gnomon's shadow falls directly on the sundial's mark that shows where noon is.
  • This is known as SUN TIME.
For the most accurate sundial set it on one of the following days:
April 15, June 15, September 1, December 24.

Keep in mind that to your sundial noon is always going to be when the sun is highest in the sky.


Friday, June 7, 2013

Harvest the Rain

Rainy days remind me of the value of water. I took this photo today as I was walking, thinking about how I wish I could collect these drops of rain and save them for the dryer days of summer to water my plants. When the rain returns to earth, it brings with it the things of the air. The air is clean and sweet in the mountains, so it is not surprising that it makes the fruits of our labor sweeter, too.


Harvesting rainwater is a simple best management practice for gardeners that has the dual purpose of saving money and water resources. At Red Hill, they sit their buckets outside to capture the rain, then use it to water their flowers. Better yet, you can connect a rain barrel to your existing gutter system to store the free, fresh water to keep your gardens, flowers, and lawns fecund all summer long. Here is a lovely picture of Red Hill's dusty miller and geranium flowers glistening with rain today in Hillsville.


Want to learn more? Check out this fact sheet from the Virginia Tech Cooperative Extension on the sustainable benefits of harvesting rainwater to treat stormwater runoff.


Friday, May 3, 2013

Window Boxes - A Little Info

We've talked a lot about container gardens in the past and we always mention window boxes, but we've never truly delved into explaining how to get a window box set up properly.

Choosing your window box:
You will need a box that spans the width of your window frame.

How to support your window box:
You will need stout steel angle brackets. The bracket ends need to be bent up in order to hold the box in place. You should then secure the box even further by attaching nooks to the box ends and using short lengths of metal chain or wire, connect to hooks that are screwed into the wall or window frame.


Now, if you have a wide flat window sill that can hold the box then you should still use the hooks and chain, this helps to stabilize the box during wind or bad weather. If your window sill is not horizontal, you will need to get wedge shaped pieces of wood to fit beneath the box and be sure that they are thick enough and spaced far apart enough for your box to be able to have a drip tray.

How to choose your brackets:
The brackets come in a variety of sizes and designs. Choose ones that suit your home's exterior, but are also strong enough to support your window box.


Tuesday, April 30, 2013

Using 5 Gallon Buckets in a Container Garden

We've noticed that our container gardening blogs are a big hit with you guys. Which is great! Container gardens are an easy way to break into gardening or to be able to maintain a garden with a busy schedule. When you have a container garden your work is cut nearly in half (if not more so) as it is easier to keep your plants healthy by keeping weeds at bay and being able to more easily amend the soil. Bucket Outlet featured a blog recently on how to use 5 gallon buckets in your garden and we thought we would share it here as well:
Vegetable gardening can seem like a huge chore to undertake, but if you create a container garden for your vegetables, you can maintain your plants much easier. All you need are some 5 gallon buckets. If you want to mix things up a little, you can also use galvanized tubs or even camouflage buckets. If you have some plants that don't need as much space, you can add smaller plastic buckets to the mix for a stepping stone effect to your container garden.

First step is to prep your buckets:
Be sure that your bucket is either new, or if it is a recycled bucket that it was never used to hold any type of chemical since you will be growing foods for consumption in them.
Using a drill, make drainage holes in the bottom of your bucket, they should be about 5/8". You will need about 10 or so holes for good drainage.
To keep the holes from getting stopped up with soil, add about 1-2" of gravel to the bottom of you bucket.
Fill with a good potting soil, fill to within 1.5" from the top of the bucket.

Plant your Vegetables:
Choose your vegetables that you want to plant, be sure you read how much space each plant needs, how much sun, and water.
Plant your plants according to their needs. Try not to plant too close to the sides of the bucket or you risk your plants getting too hot. Keep them at least 1.75" from the edge of the bucket.
If you have plants that are small enough to plant near one another, keep in mind which plants make good companions to each other.
Place your buckets in your yard for the best sunlight, and easy access for watering. You will need to check container plants daily for whether they need water or not as container plants tend to dry out more quickly.

Be sure to harvest fruits and vegetables as they ripen, this will help your plants continue to produce throughout the season.
We hope this information helps you in getting started on your very own container garden! If you have tips or questions don't hesitate to leave them for us in the comments. 


Thursday, April 18, 2013

Using a Broadcast Spreader

There are a few advantages to using a broadcast spreader over a drop spreader, especially if you have a larger yard or area that you are working with. The broadcast spreader has a larger area that it spreads over vs. a drop spreader, so it will cut the time you spend spreading down.

If you are using your broadcast spreader for spreading grass seed you will find that it works much better for certain grasses than a drop spreader does. With the drop spreader some grasses will grow in streaks instead of throughout the entire yard.

There are a variety of these types of spreader on the market, many are push spreaders, but if you have a very large area to cover you may want to look into investing in an ATV spreader.

To use your broadcast spreader you will first want to read your instructions thoroughly. As well as the instructions on the fertilizer or seed that you are spreading. The seed/fertilizer should have instructions on them for the recommended speed rate.

It is advised to do a test run with a small amount of your seed or fertilizer on a clean sidewalk or driveway so that you can ensure that you have the correct settings. You will want to make a note of how far the spreader distributes on different settings and write it down for future reference. Be sure to make note of how much product you put into the spreader and how large of an area it covered. Then compare this to how much coverage the product packaging states that you should have. If it doesn't cover enough area or covers too much then you will need to readjust your settings.

Collect your product so that you can reuse it. Do not just sweep or spray off into the yard.

Now you can fill up your spreader with the recommended amount of seed or fertilizer for the area that you need to cover. You will want to walk in a pattern that allows you enough space to only cover about 6 inches of the same area, this is okay to do since the outer edges of your spraying will receive less material. Usually the best pattern to spread in will be a row pattern.


Have more tips on using a broadcast spreader? Please share them with us in the comments.

Thursday, April 11, 2013

Preventing Diseases in Your Garden

The weather is warm and the dirt is waiting to be planted and tended for your garden. Excitement is in the air as you dream about the harvest you will have this coming fall. Make sure your harvest is not hindered by plant diseases. Take these precautions to help prevent diseases from forming in your garden:

Using Cured Compost will help your plants to be stronger, a stronger plant will be able to resist diseases more easily. Don't know how to cure your compost? Follow these easy steps:
To begin the curing process stop adding organic material to your compost heap.
Turn your pile once a week to allow oxygen to permeate the materials in your compost.
Wet your compost until it is the consistency of a wet sponge.
After 3 months your compost should be ready. If there are still large particles in your pile it needs to go through the curing process again.
Keep your garden watered during droughts. A weak plant will succumb to diseases more easily.

Space your plants wide and use trellises for plants that like to spread out. This will allow air to get around the leaves and dry your plants well, a continually wet plant is a breeding ground for diseases.

Use mulch to keep any soil born diseases from splashing up onto the leaves of your plants.

If a fungal outbreak begins on your plants you can slow it by using garden shears to cut off affected leaves, branches, and/or fruits. Only cut the plant if the foliage is dry, a wet plant will cause the spores to spread more quickly. There are also sprays that you can create to help kill the fungus. There are several for each different variety of fungus, if you have plants with hairy leaves you can use a mixture of 1 tsp baking soda to a quart of water and some drops of liquid soap as a spray mix.


A great sprayer for applying necessary treatments to sick plants or to spray on preventative treatments are the Solo sprayers.

Thursday, March 28, 2013

Garden Tasks as we Head into April

With all the snow we've been having lately it is hard to believe that we are already six days into spring. If you are still having snow these tasks may have to wait until the ground warms up a bit for you, but we wanted to go ahead and share this information with you.

Plant your leaf lettuce: keep in mind that they need 6 to 8 hours of sunlight a day.

Inside you will want to start your leeks: remember to plant one starter container for every leek you want to grow.

Also it is time to start your tomatoes inside: plant one starter container for every 10 to 12 lbs of tomatoes that you want. Also don't forget to invest in tomato rings and cages for when you plant them in your garden.

Plant green onions: your onions will need 6 to 8 hours of sunlight a day.

Plant carrots: they need 6 to 8 hours of sunlight a day.

Sow your hardy annuals such as wild flowers.

Repot any indoor plants that are starting to look tired. This is usually a sign that they need fresh dirt and a larger pot.

Time to plant fruit trees or wait until next year to do so.


Thursday, March 21, 2013

How to Prepare your Garden's Soil

To have a garden that grows well you have to have good soil so that the plants can thrive. Good soil has the nutrients that your plants need to grow and form beautiful fruits and vegetables.

To know what kind of soil you are working with you will want to have your soil tested. Your local County Cooperative Extension office should be able to supply you with information on soil testing in your area. Your soil sample will be sent to a laboratory and they will send you results that let you know what nutrients your soil needs and give advice on what steps should be taken in order to remedy this.

When you are adding nutrients to your soil after the soil test, you will only want to add nutrients that the test has deemed are needed. Adding things that are not needed can throw off the pH of your soil.

Fertilizer is also a needed additive to your soil, especially if you are growing a vegetable garden. Fertilizer will help your plants to produce much better fruits. There are many options in fertilizer in the categories of inorganic and organic.

If you want to fertilize your garden organically, one of the best ways is to create and use your own compost. For more information on composting check out these previous blogs:

Composting
Do NOT Compost These Items
Over 70 Things for the Compost Pile

Other organic fertilizers you can use in your soil are kelp, dried blood, cottonseed meal, cattle manure, horse manure, and chicken manure.

When using an inorganic fertilizer over a large area then you may want to look into using a broadcast spreader. This will help you even distribute the fertilizer over a large area.

During the growing season you may want to apply a side dressing (a boost of fertilizer) so that your plants continue to get the needed nutrients they need. To apply a side dressing you will want to make a 4 inch deep trench along one side of your plant row. Do not disturb the roots of the plants when you do this. Place your fertilizer into the 4 inch trench and cover it up with the removed soil. Watering your plants and rain will work your fertilizer into the soil so that it is easily used by your plants.


Wednesday, March 6, 2013

March Gardening Tasks

Spring will be upon us soon, what are somethings that you can be doing to help your garden?

Get out your gardening tools and be sure they are cleaned up and repaired if repairs need to be made.

Start indoor transplants of tomatoes, lettuce, eggplants, parsley, peppers, and other vegetables.

Turn your compost pile. (really this should be done weekly)

Start putting out your birdhouses. 

Fertilize shrubs and trees.

Prune fruit trees before the buds swell.

Start preparing the soil for your vegetable garden.

Peas, sweet peas, asparagus, rhubarb, artichokes, strawberries, blueberries, fruit trees, and horse radish can begin to be planted now.

Repair damaged areas of your lawn.


Tuesday, February 26, 2013

Preparing Containers for Plants

To use a container in your container garden you must be sure that it has enough drainage, is clean, pest free, and disease free. It also needs to be in good condition so that it will last longer. Whether you use planters, buckets, or a metal wash tub for your plants the following tips should be beneficial to you.

Clean Your Container:
If your container has been used in the past whether for planting or other things, you will want to be sure that you wash the container with a mild detergent. While washing your container checked for any damaged areas that may need to be fixed. Cracks can give way to the pressure of a plant's roots against them resulting in a broken container during the growing season. If the container cannot be fixed you may want to discard it in lieu of another one.

Proper Drainage:
Container grown plants have trouble if they do not have adequate drainage. The excess water can cause your plants to become water logged and this will make them sick or even kill them. You will need to have holes at the base of your container for excess water to be able to escape. If your chosen container does not come with holes already in it, then you will need to carefully drill some. To keep the holes from being clogged you will want to add gravel to the bottom of your container, 1-2" should suffice.

If your plant is on a surface that needs to be protected from water, then you will want to have a drip tray beneath it to catch the excess water that will come out.


Monday, February 18, 2013

Getting Ready for Spring

Don't' wait until the last minute to prep everything you need for your spring gardening. Here are some things that you can tackle now:

Work on your tools. You will want to tackle your gardening tools so that they are in the best shape possible before you begin using them. Sharpen any cutting tools. Clean, oil, and sharpen your digging tools. Replace any tools that are too damaged for repair.

Once the ground has thawed you can start planting your woody plants. If you have any shrubs or trees that need to be relocated the same rule applies to them as well, it can be done once the ground has thawed.

Clean up your yard. Winter can leave a lot of debris lying around. Broken branches, dead plants, leaves, etc. Get out your rake, wheelbarrow, gloves, and anything else that will help you tackle the mess.

Using compost or fertilizer bring your yard back to life and give your soil the much needed nutrients it will need to help your plants grow this spring.

Prune and shape any woody plants that need it.

Now sit back and plan our what you are going to plant this spring.


Related Posts Plugin for WordPress, Blogger...