Monday, July 30, 2012

Eating Local Food

Perhaps you didn't get a chance to grow a garden this past year, or didn't have the experience and were shy to start. That's okay, you can start a garden next year. (We have some tips over at Starting a Garden) But what do you do if you didn't grow any food, but want fresh local produce?

We have come across a very neat website that allows you to search for the type of food purchasing you are interested in by your location. You can choose to search for Farms, CSAs, Farmers Markets, and more. This website is: http://www.localharvest.org/

Local Harvest even has a blog that gives gardening tips, food news, and more. And by finding and supporting the local food growers in your area, you will be helping to build your local economy. If you find a place that you love to shop for local food, keep them in mind when you start growing your own food, sometimes you need extra produce to supplement your own stock, especially if you are planning on putting away food by canning, dehydration, freezing, or pickling.

Purchasing local food is important in many ways, beyond just helping to build your local economy.

Local food is:
  • fresher than produce that is trucked in from far away
  • local food fosters community growth by allowing people of the community ways to interact with one another and with the people who grew their food
  • higher in nutrients, in addition to being fresh, fewer nutrients leak out when you receive and eat your produce closer to the time that it was picked from the plant.
  • you can talk to the people who actually grew the food, ask about their methods and learn more about the process.
What is your favorite local food?


Did you purchase some local food in bulk? Get some canning supplies and preserve it to make it last longer.

Monday, July 23, 2012

How to Help Stressed Tomatoes

If your tomatoes are starting to look stressed from the unusually warm weather we've been having, there are a few things that you can do to help revive them and get them to prosper for the rest of the gardening season.

The first step you will need to take is picking off as many of the wilted leaves on your tomato plants as you feel comfortable with and getting rid of them in your preferred method, just do not return these leaves to the soil that your tomatoes are growing in.

Step two is to arrange a shade cover for your tomatoes to help protect them from getting too much sun.

Now is also a good time to make some compost tea to give your tomatoes a nutrient boost straight to their roots. Just use a good garden sprayer to apply.


For more tomato saving tips visit: https://www.motherearthnews.com/grow-it/saving-stressed-tomatoes.aspx


Monday, July 16, 2012

What Was a Victory Garden?

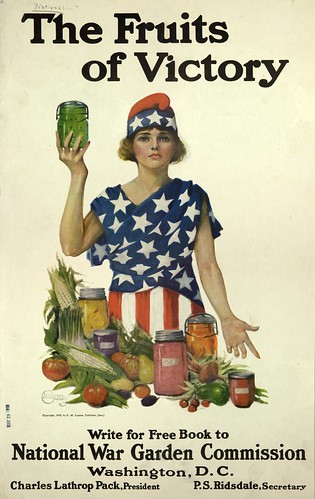
If you've been perusing the internet lately searching for info on gardening, you may have come across vintage posters and signs stating things like:

Plant a Victory Garden, Our Food is Fighting
Your Victory Garden counts more than ever!
The Fruits of Victory
There are many many more vintage posters like this. But where did they come from and what was their purpose?

During the World Wars (I & II), the United States had to hand out ration cards to families, limiting them to a certain amount of food each week. This was to help ensure that there was enough food to be sent to the soldiers who were fighting. To encourage the public to make their weekly food allowance stretch, the Victory Garden was brought about.

At the time of the wars, trains and trucks were used to transport soldiers and vehicles, not foods, so people were limited to locally grown produce and foods. By 1944, near the end of WWII, 40% of all the vegetables grown in the United States was grown in a victory garden. Nearly everyone that could participated in growing victory gardens, even in cities apartment dwellers would all pitch in and have a roof garden for their building, sharing the labor and the food.

Even the public school systems got involved, growing victory gardens in the school yards to supplement the children's school lunches.

When harvest time came around people would bring out their canning supplies and can the excess produce for storing to use during the winter. Just this simple act helped many families stretch their ration cards year round.

The Victory Garden helped not only to feed families here at home during these wars, but they also ensured that enough food was able to be sent to the troops on the front lines.

Monday, July 9, 2012

Vegetable Harvesting Guideline

There are many different vegetables that people like to grow in their gardens. Each one is a bit different about when it is ready to be harvested. Here is a guideline to help get you started:
  • Watermelon: When your melon is ripe the white spot on the bottom of the melon should change to a deep yellow. Some people can hear a change in the sound made (hollow sound when ripe) when the melon is thumped with a finger. 
  • Turnips: When turnips have gotten too ripe they will be woody, to prevent this, harvest your turnips when they are 2-2.5" in diameter at the soil line.
  • Tomatoes: Harvest tomatoes when they are fully colored and slightly soft to the touch. Gently twist and pull from the vine. 
  • Summer Squash:  Best when picked young, needs to be checked often, pick when skin is soft enough to poke your fingernail through.
  • Spinach: Harvest by cutting at the soil line before you see a flower stalk beginning to shoot up as spinach goes to seed quickly.
  • Radishes: Radishes mature quickly. You will see the shoulders of the bulbs popping out of the soil line when ready for harvesting. Be sure to not wait too long to harvest, as if left too long, they will become tough and eventually go to seed. 
  • Potatoes: For full size potatoes, wait until the tops of the potato plants dry and turn brown. Start digging from the outside perimeter and move in cautiously to avoid slicing into potatoes. ‘New’ potatoes can be harvested when the tops start to flower. Carefully dig at the outer edges of the row. 
  • Peas: The pea pods should look and feel full. Peas are sweeter if harvested before fully plumped. To truly determine if the peas are sweet enough, they should be tasted.
  • Onions: Onions can be dug once the tops have ripened and fallen over. Allow the onions to dry in the sun.
  • Leeks: Harvest when about 1 inch in diameter.
  • Eggplant: Slightly immature fruit tastes best. Should be firm and shiny. Cut rather than pulling from the plant.
  • Cucumber: Check daily and harvest young. Timing and length will differ with each variety. The fruits should be firm and smooth. Over ripe cucumbers can be very bitter or pithy.
  • Corn: About 3 weeks after the silks form, they will turn dry and brown. The kernels should exude a milky substance when pricked. 
  • Cauliflower: Your home grown cauliflower heads will probably never match supermarket size. Harvest when the head looks full and while the curds of the head are still smooth. 
  • Carrots: When ready for harvest the tops of the carrot will show at the soil line and you can gauge when the diameter looks right for your variety. If the diameter looks good, chances are the length is fine too. But you will need to pull one to be certain. Carrots can be left in the ground once mature. A light frost is said to improve and sweeten the carrot's flavor.
  • Cabbage: The cabbage head will feel solid when gently squeezed. Needs to be harvested when it reaches maturity or it will continue to grow and split open.
  • Brussels Sprouts: The sprouts will mature from the bottom up. You can begin harvesting once the sprouts are at least an inch in diameter. Harvest by twisting off or cutting the sprout from the stem.  
  • Broccoli: Don't expect your home grown broccoli to get to the size of supermarket heads. We eat the unopened flower buds of broccoli, so check frequently, especially as the weather warms up, to ensure you don't let the flower heads bloom. Harvest when the buds are about the size of a match head.
  • Asparagus: Begin harvesting when spears are 6-8 inches tall and about as think as your small finger. Snap them off at ground level and new spears will continue to grow. Stop harvesting about 4-6 weeks after the initial harvest, to allow the plants to produce foliage and food for themselves.

For baskets, buckets, and other containers to help carry in your harvest visit Bucket Outlet.


Monday, July 2, 2012

July Gardening Tasks

Hard to believe that June is already over. Now that it is July, what should you be doing in your garden?

Now is the time to plant garlic, rhubarb, and many different onions for next season.

Also plant out more salad crops to keep a continuous flow of harvest-able plants throughout the summer.

Mid-July you will want to have your cool season seeds planted.

Begin harvesting produce as it is starting to ripen. Some plants that are harvested from immediately will actually create more produce. 

Transplant your strawberries that have rooted from runners. If you do this now, the new strawberry plants will bear fruit next year.

Also be sure to keep your plants watered. For watering tips visit: How Should You Water Your Garden?

And don't forget to continue weeding your garden beds.


Related Posts Plugin for WordPress, Blogger...